
There are many options for Invoicing in Discover - this guide outlines the processes below (for first-time invoicing, please see here).
Please click on a menu item to be taken to the relevant section:
- Automatic Invoicing and Cycles
- Manually Invoicing
- Manually Sending Final Invoices
- Invoice Reminders
- Reversing Invoices
- Resending Invoices
- Direct Debiting and Invoicing
- Previewing Invoices
- Realigning/Backdating Invoices
- Invoicing between Cycles
- Ad-hoc Invoicing
- Sending an Invoice to two people
- Invoice Appearance and Detail
- Family Boost
- Example Invoices
Automatic Invoicing and Cycles
Automatic invoicing is switched off by default, but can be configured via Centre Settings > Centre Details > Invoice Settings.
From here, tick the checkbox labelled "Automatic Invoicing On".
In this section, there are some key fields you will need to complete in order to successfully automate your invoices according to a cycle:
Invoice from Monday of: This field determines the invoice cycle for your centre (advance or arrears).
- If you would like to bill your families in arrears, you will need to select 'Previous Week' or 'Current Week' (if current week, opt for a Friday billing).
- To bill in advance select 'Current Week' or 'Next Week', '2 Weeks' etc (if current week, opt for a Monday billing).
When you click on each option, the system will show you which dates you would be invoicing if you were to begin invoicing now.
# of Weeks to Invoice: Setting this field will indicate to the system how many weeks you would like to bill for. For example, if your service were to select Invoicing for the Current Week, and selected 1, your families would be billed just for the current week. Selecting Next Week, and 2, your families will be billed from the following Monday for a fortnight.
Create Invoices On/At: This is the day and time your invoices will be sent to your families.
How Often Invoicing Runs: Invoices will be generated weekly by default, however you can specify you would like them created per your billing cycle, or daily, by selecting the relevant choice from the dropdown. The "Cycle" option is determined by your selections in the fields described above.
Email Invoices/Statements To Centre Only: This is ticked by default, and will need to be unticked in order for your families to receive their statements.
Invoiced up until: This field will tell you the date to which your families have been invoiced at the current time.
Note: Further options for invoicing in this section will allow you to specify how much detail your invoices will include, and whether you would like to combine your invoices and statements (this is recommended by Discover).

Manually Invoicing
If you would like to manually invoice your families, this can be done via Bulk Actions > Select Action Dropdown > Enrolment Invoices.
1. Enter the dates you would like reflected in the invoice next to 'Children Enrolled Between'.
2. Filtering options allow you to refine by the status of the child and/or their room.
3. Clicking >> will select all children to invoice, or alternatively, clicking on the name of the child, then '>' will allow you to select individual children.
4. Specify whether you would like to send the emails now, or delay.
5. Click 'Create Enrolment Invoices'.
Note: If you are using automatic invoicing, creating a manual invoice will increase the balance of the next automatic invoice. For this reason we do not recommend using the two methods in conjunction.

Manually Sending Final Invoices
- Navigate to the Children > select Child > Set Leaving Date on the Child's Detail screen (at the bottom of the page) - this will change all the required enrolments.
- Go to the Account tab > select 'Create Invoice'.
- Set the Invoice Type to Enrolment Invoice.
- In the Date To - select the last date available (or the date you want to invoice up until) - this is a list of all periods that have not yet been invoiced.
- Alter any of the other available fields as desired.
- Click 'Create' or 'Create and Email'.
This will create the final invoices and reflect on the Account - you may wish to then produce a Statement - 'Show Statement'.
If you are using the Centre Bond feature, please review the article on Bond Management
Invoice Reminders
If you have bill payers with overdue invoices you can automatically send them a reminder, including if they have left the centre and are no longer attending.
To enable automatic chasing:
1. Go to the Centre Setup -> Templates and edit the template Reminder. Be sure to keep the body tag (#BODY#) which is replaced automatically with a note about what invoices are overdue, when and how much.
2. Go to Centre Setup -> Centre Settings and enable the Automatic Statement Reminders from the invoicing section.
The due date is controlled by setting the Invoice Due Days field. After this many days, the invoice will be considered overdue and the billpayer will be emailed.

When automatic reminders are on, your customers who have not paid by the due date on their invoice will be automatically emailed a reminder statement every X days until paid - X being the number of Due Days, or on the "Last Day of Month" if selected. If the customer does not have an email address the invoice will be emailed to the centre administrator for distribution
Suspend Automatic Reminders
Some bill payers may have a payment plan agreement with the centre. To suspend sending the automatic statement reminder for the specific bill payer, you can go to their Contact Details page and enter the agreed date on the Suspend Overdue Notice Until.

Reversing Invoices
If a mistake has been made on your invoices and you need to make amendments/adjustments, you will be able to reverse the invoices in bulk and resend.
1. Navigate to Bulk Actions > Reverse Invoices.
2. Select the relevant date*.
3. Click the red Bulk Reverse Invoices button.
From here, make adjustments to resolve the errors in the invoice, and resend via Bulk Actions > Enrolment Invoices.
Alternatively, these corrections will be reflected in the next cycle, as Discover will always invoice all enrolments.
*The system will reverse all invoices created after this date. Eg, if you need to reverse an invoice for enrolments dating 16/01/2023 through 22/01/2023, you will need to specify 15/01/2023 as your date.
You can also reverse invoices for individual accounts.
1. Navigate to the Child Record > Account > Click the invoice you would like to reverse.
2. Click on 'Reverse'


Resending Invoices
If you need to resend invoices to all families, this can be done through Bulk Actions > Resend Invoices.
From here, select the date before the day the invoices were produced. Any invoices generated after this date will be resent.

If an individual family has not received their invoice and would like another copy, this can be done via Children > Contacts.
1. Check the email address of the Bill Payer is correct (make adjustments if needed).
2. Click the 'Account' tab, and locate the date of the invoice the family would like resent.
3. Next to the relevant date click 'Invoice' under the 'Type' column.
4. Click 'Email Billpayer'.

Please note: If a family is still not receiving emails, check whether 'Suspend Emails' is ticked in the bill payer's profile, under the contact details tab, and untick if necessary.
This box will be automatically ticked if the parent/guardian has unsubscribed from emails.
Additional troubleshooting can be found here.
Direct Debiting and Invoicing
Direct Debiting runs alongside Invoicing but the Invoice does not inform the debit amount, so adjusting your settings with the two in mind is important.
You will be able to set a default billing day for families who have signed up to Xplor Pay by Debit Success.
Navigate to Centre Settings > Centre Details tab > Invoice Settings > Default Billing Day.
Select a day of the week for your payments to be debited from families.

It is important to note that the day selected is the day the balances of your family accounts will be sent to Debit Success for processing, so the account balance as of the morning of the default billing day will be debited.
If you have made changes to an account between the last invoice run, and the billing day, the debit amount will not be the same as the invoice.
For example:
Invoices created on day: Monday
Default billing day: Thursday
Monday 28th August: Invoice for Family $208.98
Wednesday 30th August: Booked session removed (value $90), account balance updated
Thursday 31st August: Direct Debit of $118.98
If no changes are made to an account between Invoicing and the default debit day, the debit amount will match the Invoice (subject to fees/surcharges).
The family will be able to view the amount to be debited via the Home app. This will appear on the morning of the debit day.
Previewing Invoices
If you would like to review the content/amounts on your family statements, navigate to Reports > Finance Reports > Statement and Invoice Previewing > Select the relevant report.

Realigning/Backdating Invoices
If you need to reverse an invoice and make a financial adjustment (ie discount, no-charge holiday) for a time period that has previously been invoiced, a new invoice will be generated to reflect the updated information.
This replacement invoice will reflect the date that the replacement is created (rather than reflecting the date/s the changes have been made to).
If you would like to update the replacement invoice to reflect the date of the impacted days, navigate to Children > Account tab > Realign Invoices.

If you would like this process to be automatic for all backdated invoices, this can be set up via Centre Settings > Centre Details tab > Invoice Settings.
From here, tick the box labelled "Auto Align Invoice Dates".
Note: The Centre Balance report is impacted by backdating invoices and when running this report to determine the balance of an account as at a past date, the original invoice and the replacement invoice are included at the date of the transactions, however the reversal is logged at a future date.
For example, an invoice for October 2020 that is reversed in January 2021 and the replacement is backdated to October 2020 - the balance as of 31st December 2020 will not count the reversal from January 2021 but will count both October invoices.
Invoicing between Cycles
If you produce invoices on a cycle greater than 2 weeks, and you would like to invoice a new family in the middle of a cycle to get them up-to-date with their balance, you can adjust your invoice settings to ensure they are picked up.
Navigate to Centre Settings > Centre Details > Invoice Settings > How often invoicing runs > select Daily or Weekly.
Alternatively, waiting until your next cycle, any un-invoiced enrolments will be automatically picked up.
Ad-hoc Invoicing
If you have fees that are not applied on a regular basis (ie once per term), or if you need to charge for any extras (excursion fees, hats etc.), you can create an ad-hoc invoice for your families by navigating to the Child Record > Account > Create Invoice.
1. Select 'Ad-hoc Invoice' from the Invoice Type dropdown.
2. Click 'Add Item' > type in Description and Amount.
3. Select 'Create and Email' or 'Create'.

Sending an Invoice to two people
Invoices can be sent to a second person via the Contacts tab in the child record.
1. Select the current Bill Payer.
2. Scroll down to Bill Payer Details and add the additional email next to 'Copy Financial Emails To'*
3. Select Save.
*If you would like the invoice addressed to two people, the names can be added in the Account Name field.

Invoice Appearance and Detail
Adding Bank Details
To add your centre's bank account details to your invoices, navigate to Centre Setup > Templates, and search "Tax Invoice Instruction". Enter the bank details into the template and click 'Save'.
These details will appear at the bottom of your family invoices.

Invoice Detail
You will be able to specify the level of detail in your invoices by navigating to Centre Settings > Centre Details > Invoice Settings.
Next to Invoice Detail, the dropdown offers three options:
By Type: This groups items by their type
By Date: Displays items broken down by date chronologically
Verbose: Displays items by type, then by date

Adding a message/instructions to your Invoice.
The default template uses the bank account number that can be found under Payments > Integrations.

If you want to update the full template they can be found under
Centre Set Up > Templates
For Invoices Only - Templates > Tax Invoice Instructions
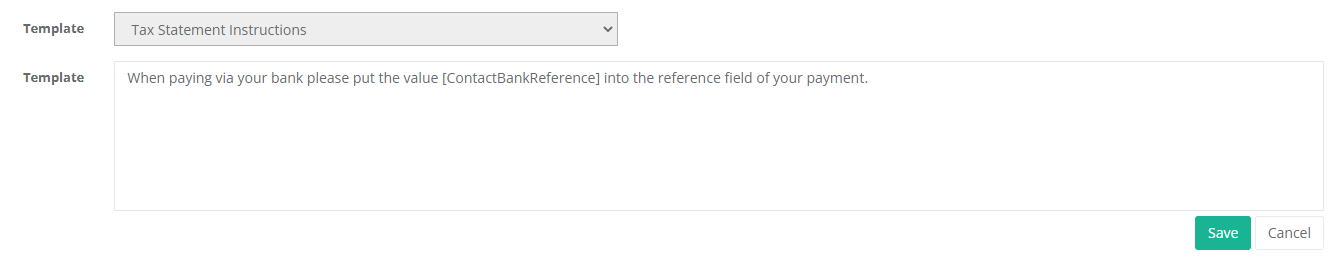
For combined Statements/Invoices - Templates > Tax Statement Instructions

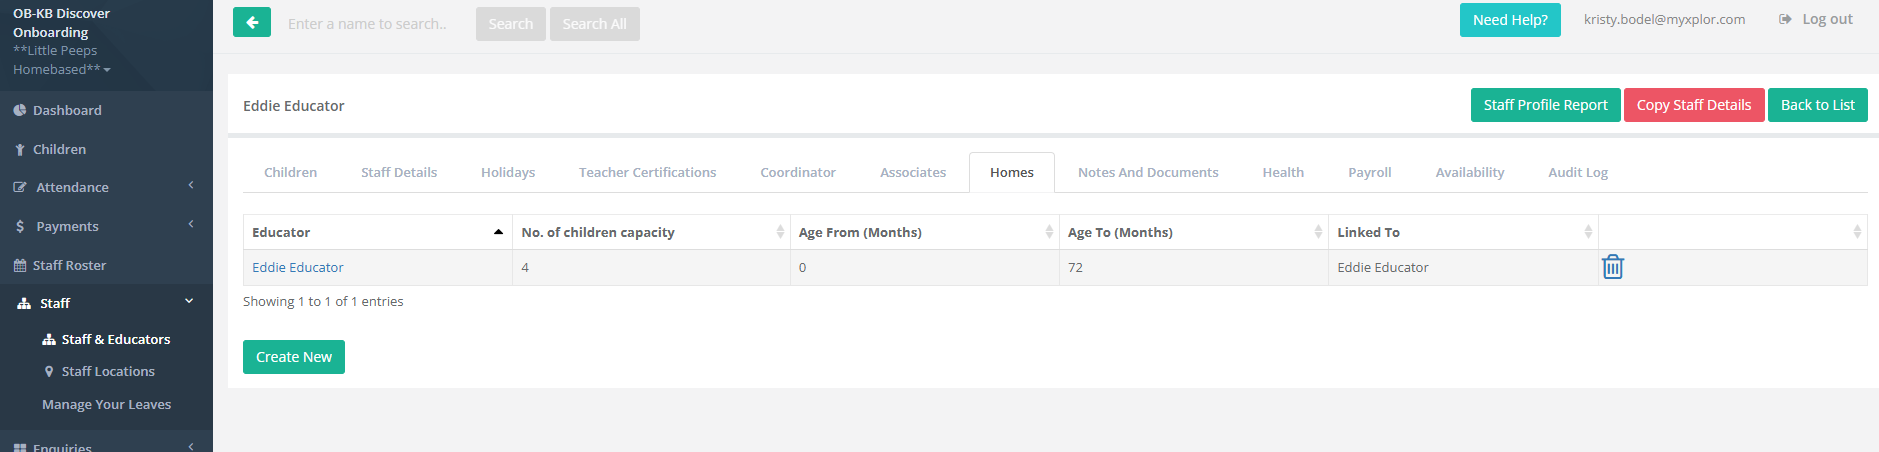
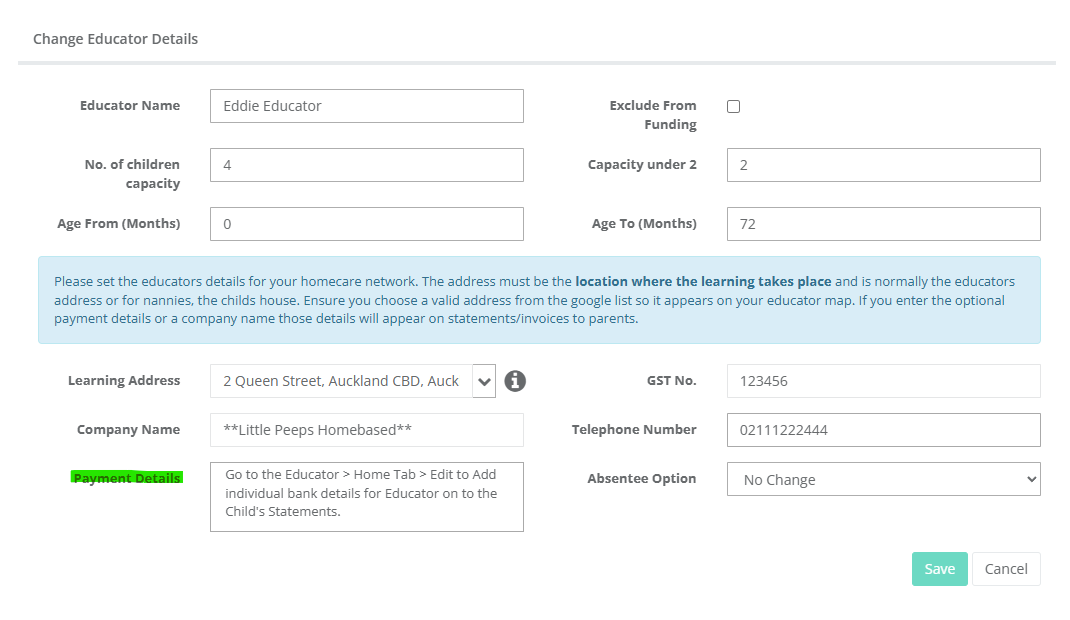
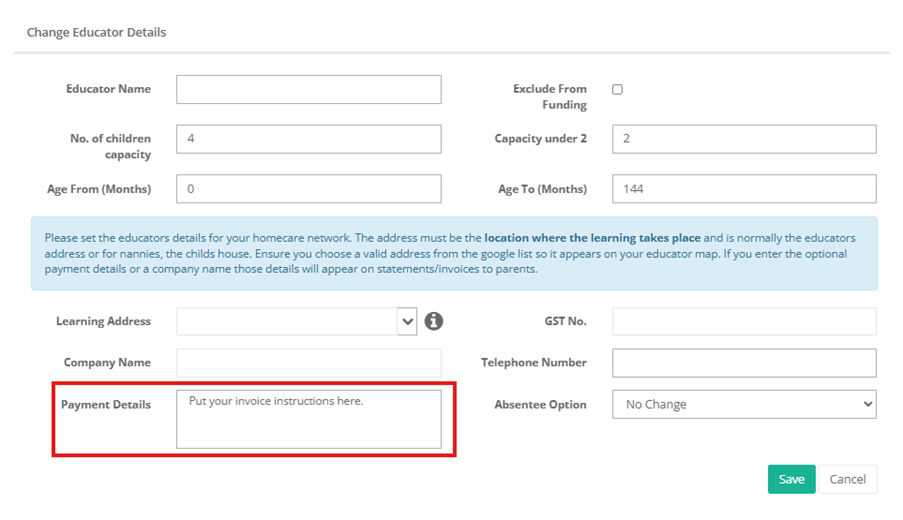
If you are a homebased service provider you can individualise the template by educator under
Staff > Staff & Educator > Select staff member > Homes > Select Educator home
Fee Descriptions
The fee descriptions on invoices can be different to the fee name you use when creating an enrolment. This can be useful if your centre uses specific codes for fees that may not be immediately clear to families.
To change the family-facing fee name, navigate to Centre Settings > Fees.
1. Click on the Fee.
2. Enter the family-facing name in the field labelled 'Fee Name on Invoice'.
3. Scroll down and click 'Save'.

Family Boost
Invoice Contents
Invoices include the below, per Family Boost requirements:
- Child's official full name
- Licence number of centre
- Name of centre
- Address of centre
- IRD/GST number
- Bill payer full name
- Invoice issue date
- Start and end date of fee period
- Final amount invoiced (after subsidies and donations have been removed)
Quarterly Statements
If specified, Discover will automatically email bill payers a 3-month statement at the end of each quarter, at 1:00pm NZT on:
- 1st October
- 6th January
- 1st April
- 1st July
Quarterly Statements will include:
- Header "Quarterly Statement" in the top-right
- Official full name of child/ren
- Summary of fees and credits/discounts
- Statement Issue date
- Statement period
- License number
Invoices, credits and discounts are included in the Quarterly Statement based on the 'Issued Date'. This is the date in the far left column on the child's Account screen or the bill payer's Transactions screen.

Examples
- An invoice is issued on 01-Jan-25 for the week of 23-Dec to 29-Dec. This invoice will be included in the Quarterly Statement for the Jan-Mar quarter because the issued date is 01-Jan-25
- A credit note issued on 31-Dec-25 for 06-Jan-25 will be included in the Quarterly Statement for the Oct-Dec quarter because the issued date is 31-Dec-24
It's also important to remember that if your invoicing did not run, or that you have $0 invoices, these will not be included in the Invoice total of the Quarterly statement.
To switch on automatic quarterly statements:
- Navigate to Centre Settings > Centre Details tab.
- Scroll to Invoice Settings.
- Tick the checkbox next to 'Automate Family Boost Statements'
- Scroll down and click 'Save'.

To manually send quarterly statements:
- Navigate to Bulk Actions > select 'Send Quarterly Statements'.
- Select the relevant Financial Quarter.
- Use the >> arrows to move all Bill Payers to the recipient list, or the > arrow to move individuals.
- Click 'Send Quarterly Statements'.

To customise the email Family Boost quarterly statements will be attached to, navigate to Centre Setup > Templates > Family Boost Quarterly Statement.

Click the template name and type in your adjustments in the text editing field before clicking 'Save'.
Example Invoices
Discover Combined Invoice/Statement
Discover Family Boost Quarterly Statement
Was this article helpful?
That’s Great!
Thank you for your feedback
Sorry! We couldn't be helpful
Thank you for your feedback
Feedback sent
We appreciate your effort and will try to fix the article