TABLE OF CONTENTS
Roster Settings:
- To Navigate to the Roster Settings:
- Select Centre Settings
- On the Centre Details Screen Scroll down to Roster Settings
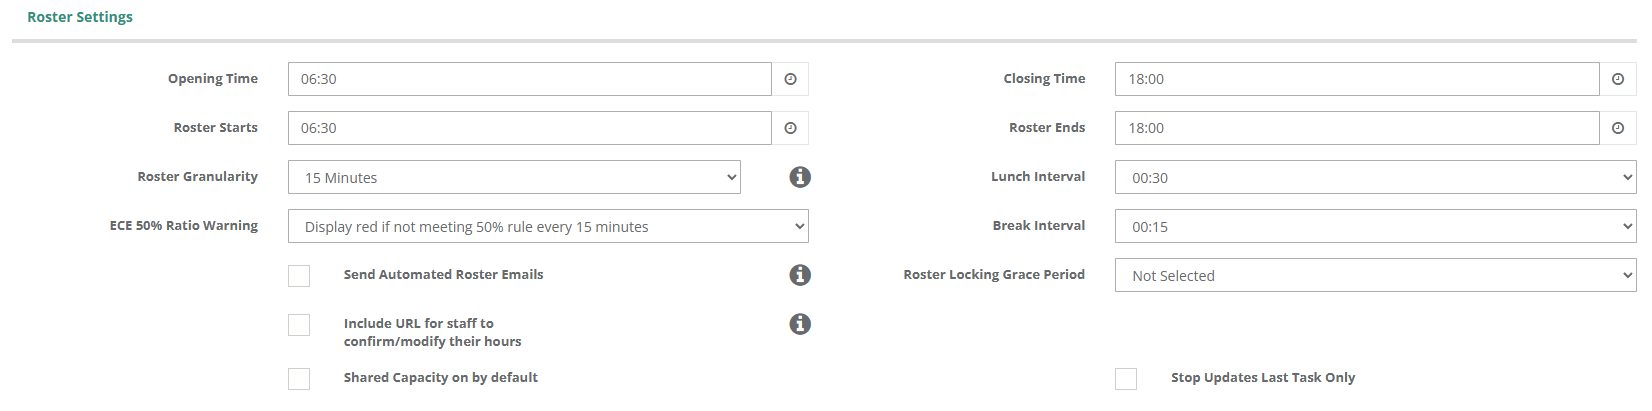
Settings to Check & Update if required:
- Set your Roster Opening & Closing Time (If you have your staff meetings outside of operating hours, keep this in mind when setting these times)
- Set your Centre Opening & Closing Times
- Roster Granularity - refers to the blocks of time on the roster. Discover recommends keeping this at 15 min blocks
- Set your Lunch & Break Intervals (How long your staff have for these breaks)
- Set your ECE 50% ratio warning - the Roster will be red if you are not meeting correct Staff Qualifications on the Roster
- Enable/ Disable Send Automated Roster Emails - this will allow an email to be sent to the staff at the end of each day with the hours they have worked.
- Include Staff URL so staff can modify their hours - The Staff Member can agree to the hours work, or amend them and the Roster will update. No notification is sent to the Centre Manager
- Roster Locking Grace Period - This is the period you can set before the roster locks. Only some staff would have access to unlock the roster and make changes.
- Shared Capacity on by Default - Allows the roster to always take in to account rule 44a when doing the roster.
- Stop update last task only - Discover recommends enabling this if you have Staff Sign in and out via the Tablet. This will limit any changes to the roster made via the tablet to update only the last active task and not the whole day
Roster Tasks
When your service in Discover is setup it will come with a selection of predetermined Shift Types and Tasks that you can choose between. However, you are able to add additional Shift Types and Tasks if required.
To Navigate to the Roster Tasks Set Up Screen
- Go to Centre Settings
- Select Centre Set Up
- Select the Roster Tab Across the top

You can select an already created shift type/task and overview it or you can create a new one.

For example:
This is the Absent Task
If you would like to upload a Roster Report into your Payroll Software, you can add the relevant absence code from your Payroll Software to the Absent task in Discover so the codes match correctly.
Within Function Name enter a Shift Type / Task name.
3. Within Function Code enter a chosen code.
4. Within Background Colour, choose your desired colour for this task.
5. Within Text Colour, ensure that a colour code has been chosen.
6. Specify if the Task being created Is Teaching and if it Is Paid or not. For example, you could create a Shift Type that is not teaching but is still paid.
7. Use the Task Boxes to specify the details of the task being created.
8. Add Payroll Codes if required.
9. Select 'Save'.

Adding Shift Types/Tasks
To set up shift types/tasks for your roster, navigate to Centre Settings > Roster.
1. Select 'Create New' at the bottom left of the screen.
2. Within Function Name enter a Shift Type / Task name.
3. Within Function Code enter a chosen code.
4. Within Background Colour, choose your desired colour for this task.
5. Within Text Colour, ensure that a colour code has been chosen.
6. Specify if the Task being created Is Teaching and if it Is Paid or not. For example, you could create a Shift Type that is not teaching but is still paid.
7. Use the Task Boxes to specify the details of the task being created.
8. Add Payroll Codes if required.
9. Select 'Save'.
Please Note: Creating shift types that are room-specific can be an easy way of tracking tasks and staff assigned to a specific room.
For example, create a task labelled "Room Name - Contact", or "Room Name - Float" then assign the relevant room.
You can run Reports > Staff report > Weekly Staff Roster Detail > Select room to see teachers allocated to the task linked to the room.
Grouping Staff
The Roster sheet allows you to group staff (for example, by room).
To add a staff member to a group
- Select Staff in the Main Menu
- Select your Staff Member

1. Under Staff Details scroll to Roster Settings.
2. Type in the name of a group you would like to create or have created previously
3. Scroll to the bottom of the page and click 'Save'.
Roster Preferences and View
Navigate to Centre Settings > Centre Details tab > Roster Settings.
Roster Granularity: Changes the time intervals on the Roster Sheet and Scheduler.*
Lunch Interval: Presets the Lunch Task to a specific duration.
Break Interval: Presets the Break Task to a specific duration.
ECE 50% Ratio Warning: Changes the ratio warnings on the Roster Sheet and Scheduler.
Roster Locking Grace Period: Discover will automatically lock the Roster after the number of business days selected here.
Send Automated Roster Emails: If ticked, Discover will send automated shift emails to staff, nightly.
Include URL for staff to confirm/modify their hours: If ticked, Roster emails will include a link for staff to confirm or modify their hours.
Shared Capacity on by default: If ticked, the Roster will automatically apply regulation 44a, allowing spare Teaching capacity for under 2's to be shared over total capacity.
Stop Updates Last Task Only: If ticked, when 'Stopping' a task/shift on the Tablet, only the last task started will be stopped.
*15 minutes is recommended.
Once you have made your changes, scroll to the bottom of the screen and select save.

Was this article helpful?
That’s Great!
Thank you for your feedback
Sorry! We couldn't be helpful
Thank you for your feedback
Feedback sent
We appreciate your effort and will try to fix the article