Your Onboarding Specialist will complete the set up, and advise you can log in.
Follow the steps below to customise your service
This guide will walk you through the essential setup required to get your service ready to operate in Discover.
TABLE OF CONTENTS
- 1. Accessing Discover
- 2. Service Details
- 3. Visual Settings
- 4. Set Up your Service Calendar
- 5. Templates
- 6. Educators & Coordinators
- 7. Digital Enrolment Form
- Milestone 2 Complete
1. Accessing Discover
Your Onboarding Specialist has created your initial user account.
To log in for the first time:
- Go to the Discover Log In page
- Select Forgot Password
- Enter your email address and submit
- Follow the email to create your password
- Log in using your new credentials
Setting Up Additional Users
To provide access for other staff:
- Go to Staff Screen
- Open the staff record
- Enter an email in System Login Email
- Select Save
Each staff member will then complete the same Forgot Password process.
The (i) icons will give you extra information about each setting.
These Settings are found in Centre / Service Set Up > Centre Details by scrolling down the page.
1. Service Details
Navigate to: Service Setup →Service Details
Review and confirm:
- Service name
- Email address
- Address and phone number
- Licence information
Important – Email Configuration - Check entire Centre Details page
If not updated, system emails may continue going to the onboarding contact.
Update email addresses in:
- Centre Details
- Xero Integration (if used)
- Email Account Settings (Name / Accounts / Marketing)
- Email Notifications
- Website Widget Enquiries
You may use one shared email or separate addresses.
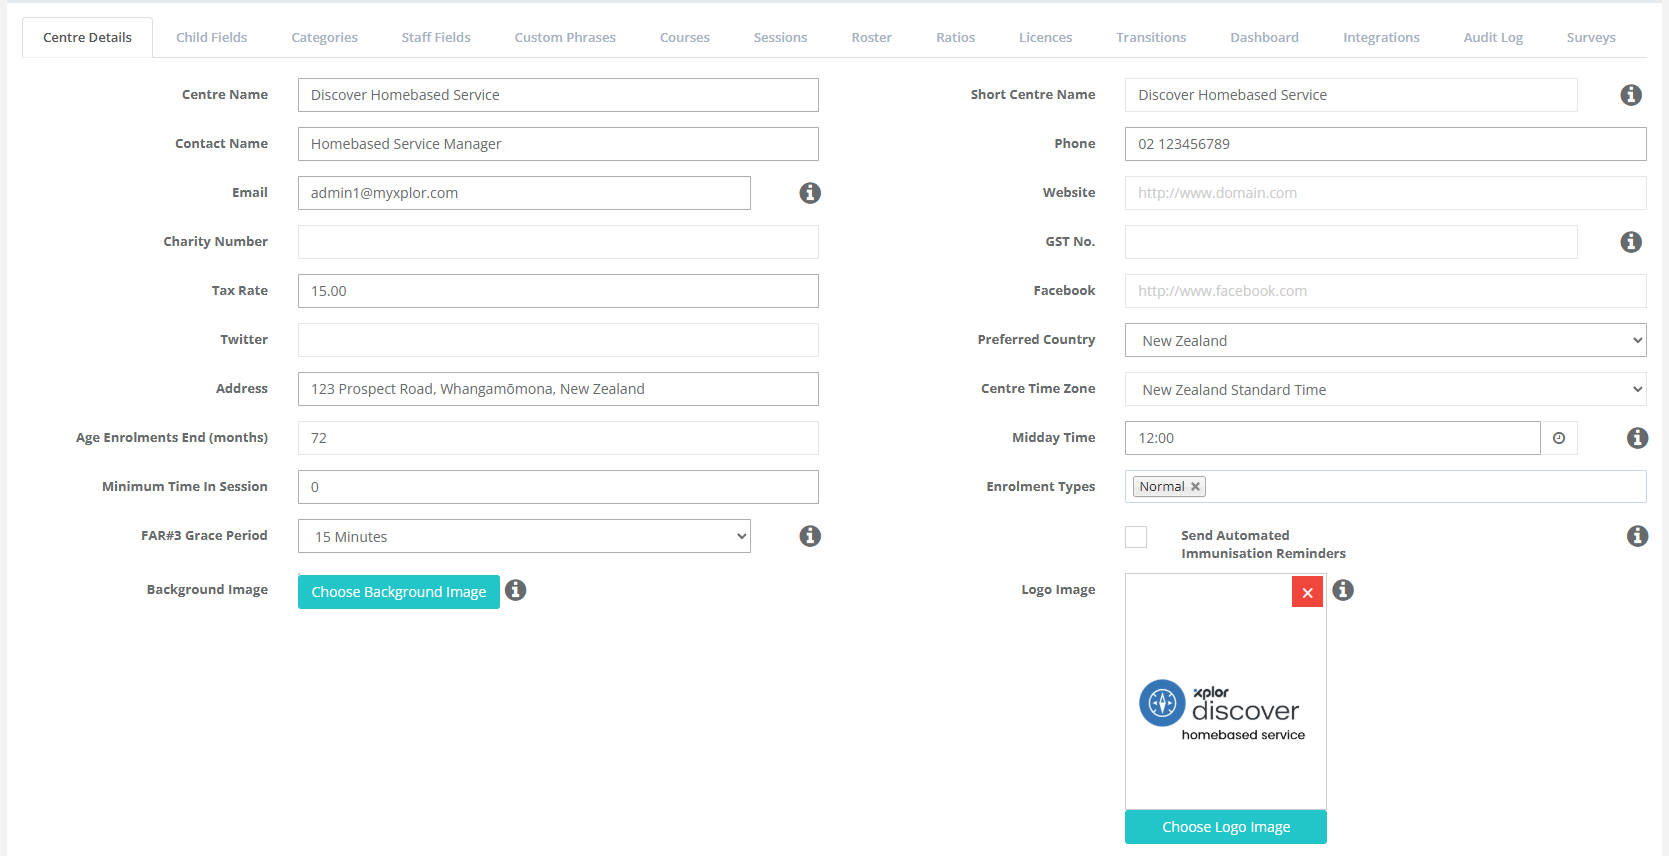
2. Visual Settings
Navigate to: Centre/Service Setup → Under Service Details
(scroll down to Upload a Logo)
Optional
Upload:
- Service logo
3. Set Up your Service Calendar
Go to: Service → Calendar
Use to track:
- Holidays
- Child movements
- Staff events
- Key dates
Action: Enter all your Statutory Holidays and Closure Dates
See here for further instructions
4. Templates
Go to: Service Setup → Templates
Edit by:
- Selecting the Template
- Making changes
- Saving
Prioritise These
- Default Email Signature
- Tax Statement / Invoice Instructions
You do not need to configure all templates immediately.
5. Educators & Coordinators
When your Discover Homebased service is created, it will include a default educator.
If you are using the Digital Enrolment Form, we recommend keeping the default educator. When a parent submits an enrolment form, the child is automatically enrolled with this educator, ensuring the enrolment is successfully created.
Once the child has been added to the system and a place is available with their allocated educator, you can update the enrolment and assign the child to the correct educator.
Understanding Educators in a Homebased Service
In a Homebased service, educators function like rooms in a Centre-based service. Each educator must have their capacity, age group, and other details configured before they can accept enrolments.
A simple way to think about it is that each educator is like a small service within your overall Homebased service. Every educator has their own capacity, enrolments, and availability, so each one needs to be set up individually before children can be assigned to them.
Create a new staff profile:
- Navigate to the Staff tab via the left-side menu.
- Select 'Staff & Educators'.
- In the Staff list, to the bottom left, click the green 'Create New' button.
- Input the relevant information to build out the core of this new staff profile.
- Under 'Employment Details', select 'Educator' in the 'Staff Member Type' field. (This is a must!)
For Coordinators select 'Coordinator' in the 'Staff Member Type' Field (This is a must!) - Press save at the bottom right of the screen.

Please note: Once you have saved the profile, you can re-enter by clicking on the Educators name from the Staff list, to add further details to their record.
If the profile does not save, please be sure to check all mandatory fields have been entered in the profile. A red outline will be displayed for any required fields that have been missed.
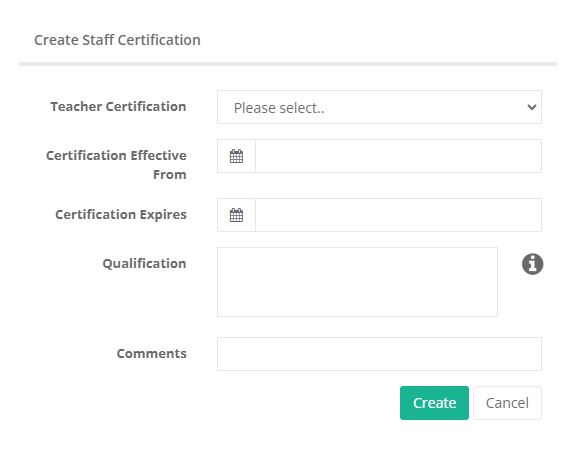
Teacher Certifications
We advise keeping records of staff members' qualifications and the period in which they were effective. This ensures Discover can specifically calculate ratios with the relevant qualification throughout the day.
As a staff member gains a new or updates an existing qualification, please ensure they are updated in Discover with the relevant dates that they cover.
- Navigate to the Staff Profile.
- Click the 'Teacher Certifications' tab.
- Click 'Create New'.
- Enter the type of certification, the effective date and expiration.
- Type in the qualification name in the Qualification field (only if 'Other' has been selected in the dropdown above).
- Type in any comments (optional).
- Click 'Create'.
Homes Tab
The Homes tab functions as a type of 'Personal License' for Educators.
When enrolling children, the Home record for the educator will be the room assigned*.
Once your Educator profile has been created, navigate to the Homes tab at the top of the record.

1. Select 'Create New'.
2. Enter the Educator's details, including capacity, age range, address and absentee option.
3. Select 'Create'.
4. You will not be able to Enrol Children under an educator unless the Homes Tab is set up
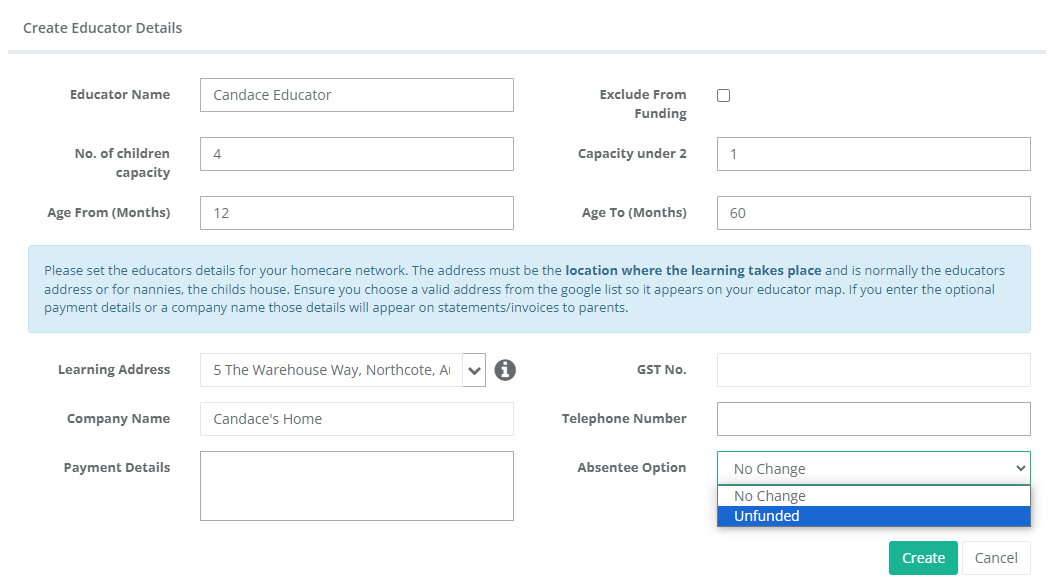
* Make sure there is text in the Payment Details Field. Even if it is ** before you save.
*If there are any difficulties in enrolling a child, the Homes tab is a useful place to check all details are correct. Regarding funding troubleshooting, the 'Exclude from funding' checkbox is of particular note here.
Associates Tab
Educators for homebased services are required to declare any adults/children aged 16+ that live in the premises they are caring for the children in.
These adults are also required to undergo police checks and be vetted appropriately, regardless of whether they are present in the home during operating hours normally.
To help services track who these associates are and make sure these checks are up to date, they can be added via the Associates tab on the Educator's profile.
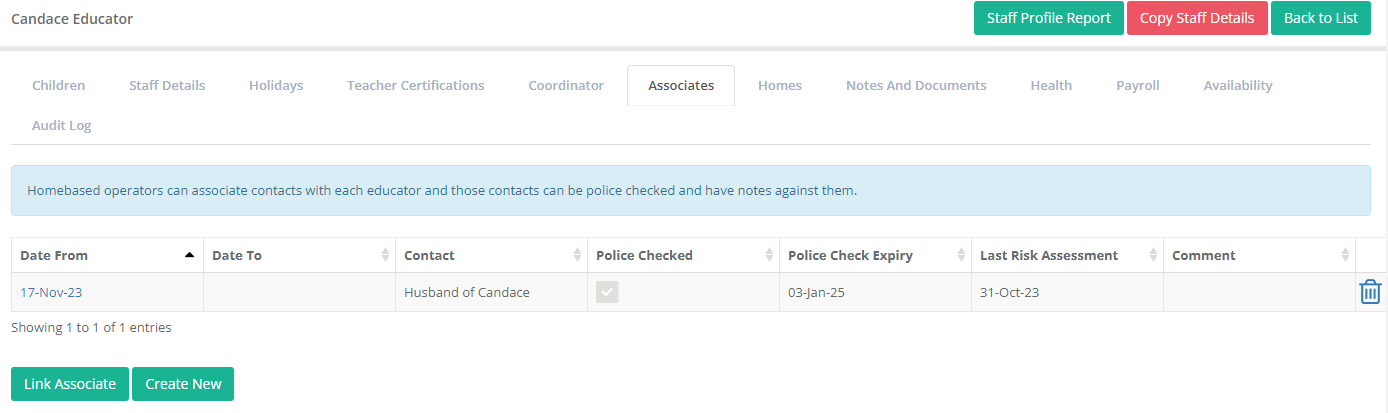
1. Click 'Create New'.
2. Enter the Associate's details.
3. Click 'Save'.

An existing contact within Discover can be added by clicking on 'Link Associate'.
Children Tab
As of 2023, Educators need to include any child of their own as one of the children in their home that will count towards the number of children in their care.
To monitor this, their child needs to be registered in Discover.
With a few exceptions, this child will not be eligible for any funding whilst in their parent/guardian's care.
1. Under the Children tab, click 'Create New Educator Child'.
2. Enter the details of the Educator's child and click 'Create'.
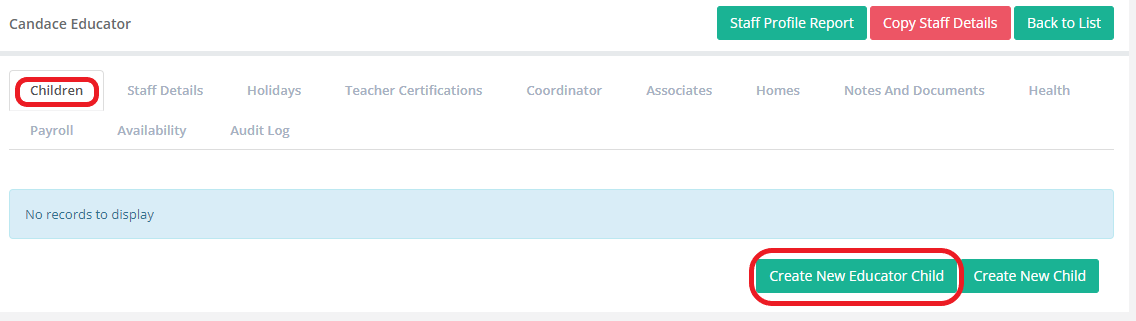
Please note:
- Once the Educator's child has been saved, Discover will automatically create an enrolment for the child that will be visible under the Educator's 'Child' tab.
- Creating their child via 'Create New Educator Child' means the child will not appear on the Attendance tab in the main menu as they do not have an NSI.
- They will also not be visible in the Child list. Their profile will only be accessible via the Educator's profile.
For further information on Staff Profiles, including the Staff Details, holidays, Teaching Certifications, Notes & Documents, Health, Payroll, Availabilities and Audit Log tabs, please see our article Staff: Profiles
Assigning Educators to Coordinators
- Go to the Staff & Educator Menu
- Select the Coordinator
- Make sure the Staff Member Type is Coordinator
- Go to the Educator Tab
- Select Create New
- Select the Starts Date
- Select the Educator
- Save
Digital Enrolment Form
Your Onboarding Specialist will set this up during Onboarding if required
Customisable via Templates and Child Fields.
Includes:
- Policies
- Declarations
- Fee information
- Upload requirements
Customise your Enrolment Form Guide here
Widgets can be used to:
- Share a direct enrolment link
- Embed the form on your website
- In your Discover Centre Go to Service Settings > Set Up Widgets
Everything you need to put the Enrolment Form on your Website is here.
Enrol in this Centre link
(Keep an eye out for Enrol in this Centre V4 coming soon!)
If you have had a data Migration, it is best practice to check your data prior to going live.
Please see here for further information.
Milestone 2 Complete
Once the following are done, your foundation is in place:
- User access set up
- Centre/Service details confirmed
- Email settings updated
- Upload your Logo
- Set up Service Calendar
- Set Up your Templates
- Set Up Educators & Coordinators
- Assign Coordinators to Educators
- Check your Migrated data if required.
You can now continue onboarding or return to optional settings as needed.
Was this article helpful?
That’s Great!
Thank you for your feedback
Sorry! We couldn't be helpful
Thank you for your feedback
Feedback sent
We appreciate your effort and will try to fix the article